Complete Guide to Removing and Replacing a Swollen Laptop Battery (Real Case with ThinkPad X1 Carbon)
In recent years, laptops have evolved tremendously: thinner displays, more powerful performance, high-capacity internal batteries, and increasingly compact designs. However, this evolution also brings new challenges for maintenance and repair. One of the most common — and potentially dangerous — issues is the swollen or “bloated” battery.
In this article, we’ll dive into a real case: a Lenovo ThinkPad X1 Carbon with a visibly swollen battery. Although the laptop was still functioning, it was clear that the battery needed to be replaced immediately to avoid risks such as chemical leakage, overheating, or even fire.
This step-by-step procedure is not only applicable to this specific model, but can also serve as a reference for most laptops with non-removable internal batteries.
1. Why Does a Battery Swell?
Before getting into the disassembly process, it’s important to understand what it means when a battery swells and why it happens.
Lithium-polymer or lithium-ion batteries — the most commonly used in today’s laptops — work through internal chemical reactions. Over time, or due to improper usage conditions, gases can build up inside the cell. These gases get trapped, causing the battery to expand.
Most common causes:
Excessive charge cycles (battery life is exhausted).
Use of an incorrect or faulty charger.
Prolonged exposure to high temperatures.
Manufacturing defects.
Frequent overcharging or complete discharging.
Main risks of a swollen battery:
Chemical leakage: Corrosive substances that can damage internal components and pose health hazards.
Fire or explosion: If the battery short-circuits or is punctured.
Structural damage: Swelling can warp the laptop’s chassis or put pressure on the motherboard.
2. Clear Signs Your Battery Needs Replacement
In the case of the ThinkPad X1 Carbon, the signs were obvious:
The bottom of the laptop was slightly bulging.
The touchpad no longer fit perfectly in place.
The battery life had decreased significantly.
Other common symptoms include:
Laptop casing doesn’t close properly.
Creaking noises when pressing on the base.
Battery drains quickly or fails to charge.
Unusual overheating.
3. Safety Precautions Before Opening a Laptop with a Swollen Battery
Working with a defective battery requires extreme caution. Here are some recommendations you must follow:
Do not puncture, crush, or bend the battery. Even a small puncture can trigger a violent reaction.
Avoid exposing it to heat (no hair dryers or direct sunlight).
Wear protective gloves and, ideally, safety glasses.
Keep a non-conductive container (plastic or glass) nearby to place the removed battery.
Ensure proper ventilation in your workspace.
4. Tools Required for the Replacement
For this procedure, the following tools and materials were used:
Screwdriver suitable for the model (in this case, a small Phillips). Some laptops require Torx or star screwdrivers.
Plastic spudger or pry tool (never metal, to prevent short circuits or scratching the chassis).
Protective gloves (to avoid contact with potential chemical leaks).
Non-conductive container (anti-static bag or plastic box).
Microfiber cloth to clean internal dust.
New original or certified compatible battery (exact model: 0OHWD28 for the ThinkPad X1 Carbon).
5. Step-by-Step Disassembly (ThinkPad X1 Carbon Case)
Step 1: Fully Disconnect the Device
Shut down the laptop completely.
Unplug the power adapter.
Hold down the power button for 10–15 seconds to discharge residual energy.
⚠️ This step is essential to avoid short circuits during disassembly.
Step 2: Remove the Bottom Cover
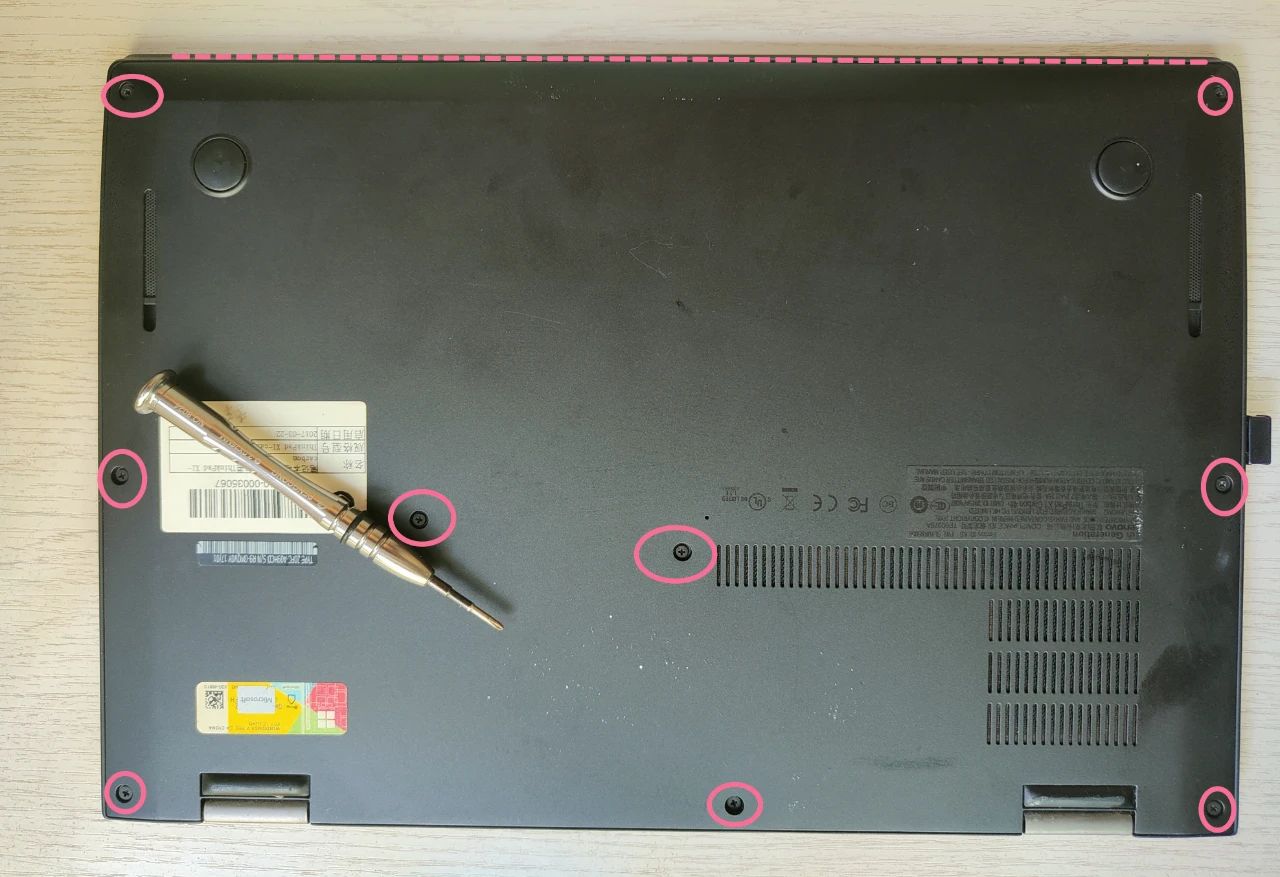
Place the laptop upside down.
Locate the visible screws (in this case, 9 Phillips screws).
Carefully loosen them and store them in a container to avoid losing them.
Use a plastic pry tool to separate the bottom cover. Due to the swelling, the cover may come off easily in some cases.
Avoid using excessive force to prevent breaking the retaining clips.
Step 3: Identify the Battery
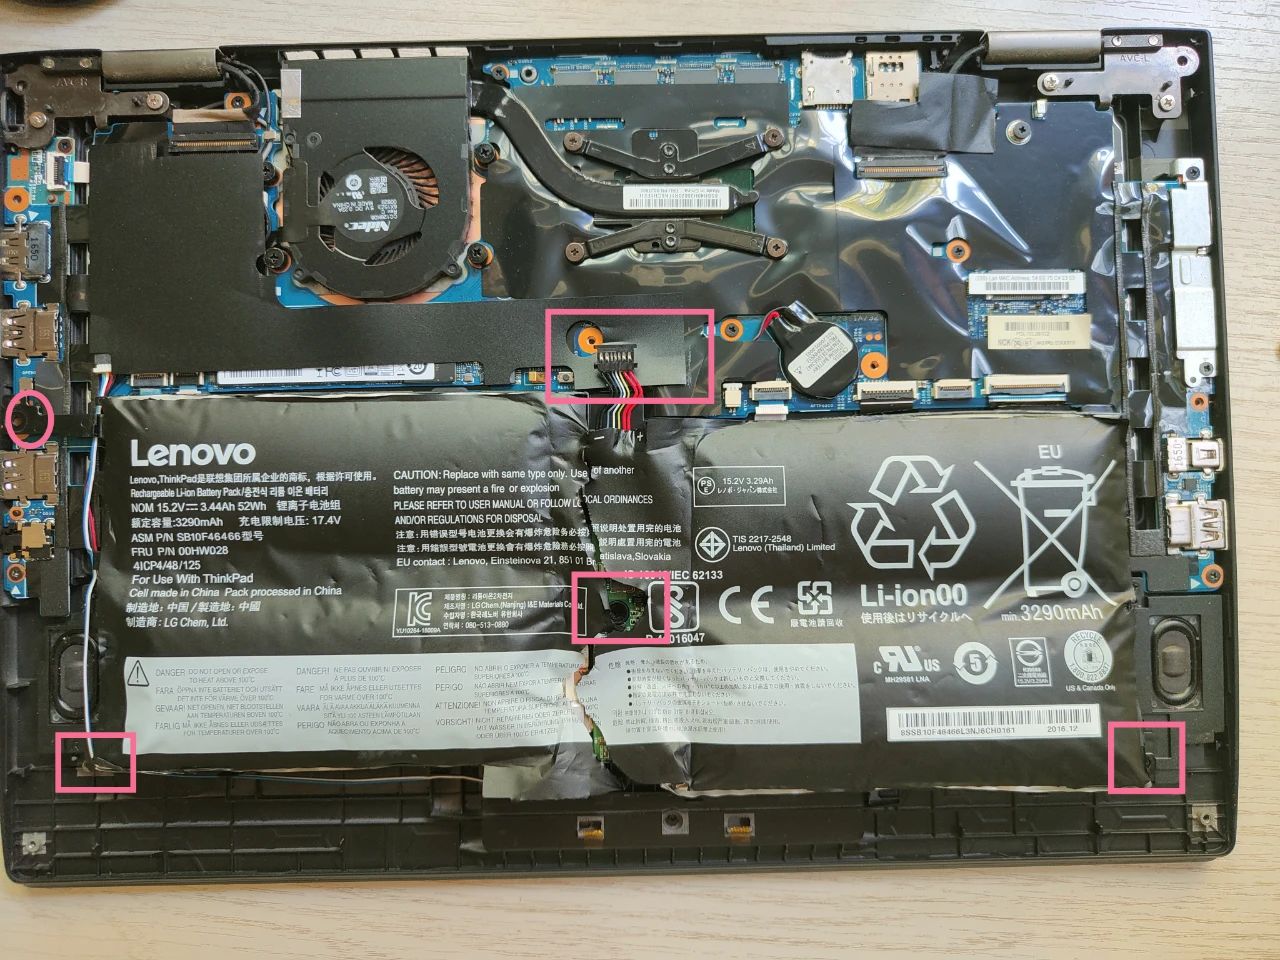
The battery is usually a flat rectangular component connected to the motherboard via a cable or ribbon connector.
Locate the screws securing it to the chassis.
Step 4: Disconnect and Remove the Defective Battery
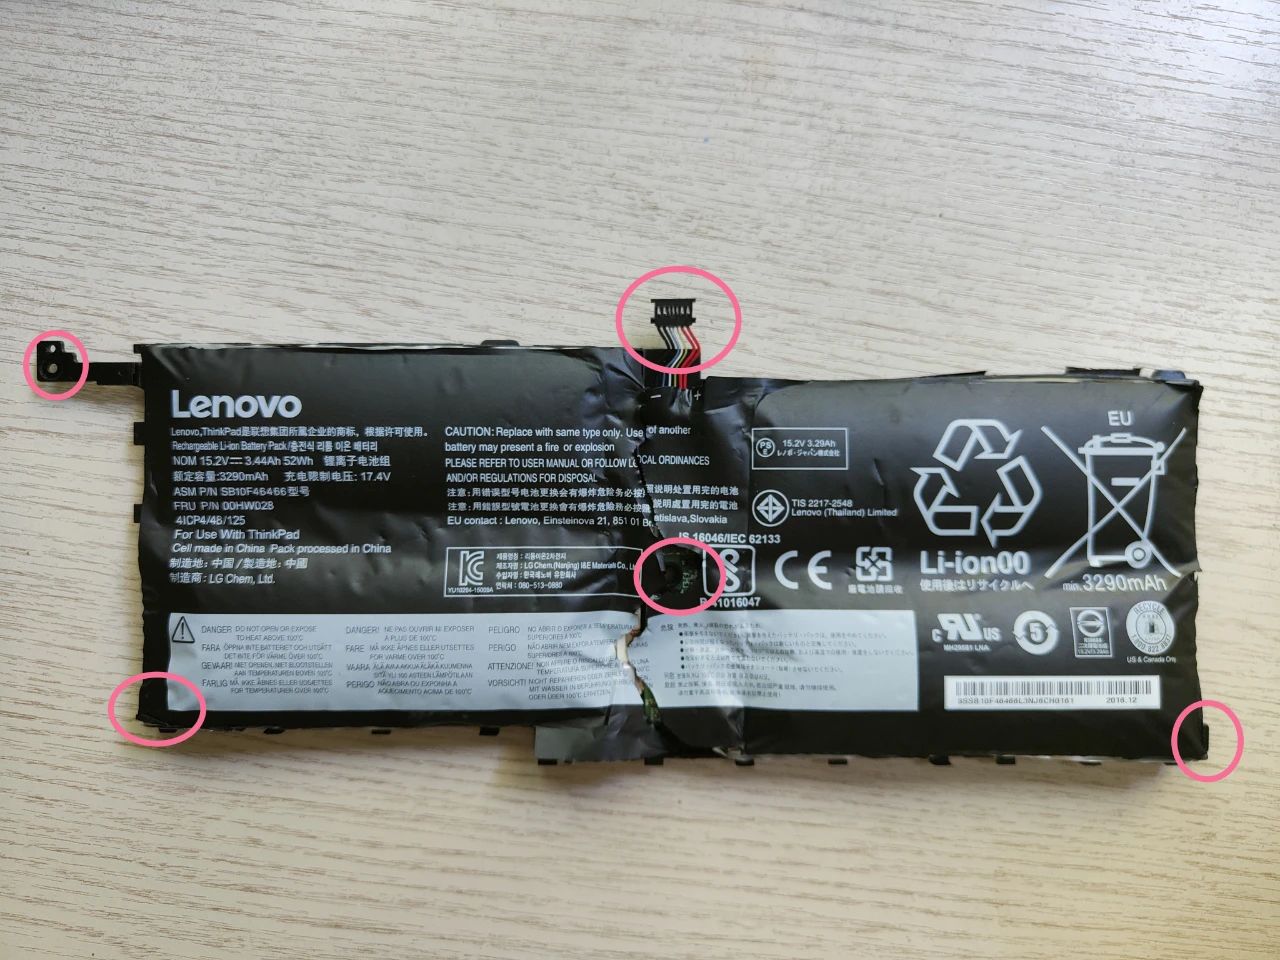
Gently disconnect the ribbon cable or connector.
Remove the screws securing the battery (3 screws in this case).
Use the plastic pry tool to lift it gently.
Place the swollen battery into the non-conductive container.
6. Purchasing the Replacement Battery
For the ThinkPad X1 Carbon, the replacement battery has the code 00HW028.
It’s always recommended to:
Buy original or high-quality compatible batteries.
Avoid products from dubious sources.
Double-check the model number before purchasing.
At senove.com you can search the code to find a 100% compatible battery.
7. Installing the New Battery
Place the new battery in the same position as the old one.
Secure it with the original screws.
Connect the cable or ribbon connector to the motherboard (respecting polarity).
Reattach the bottom cover and secure it with the screws.
8. Power On and Test
Connect the charger and turn on the laptop.
Check that the system detects the new battery.
Charge the battery fully for at least 3 hours before intensive use.
9. What to Do with the Defective Battery
A swollen battery must never be disposed of in regular household trash. It contains chemicals that require safe disposal.
The best options are:
Local recycling centers.
Authorized e-waste collection points.
Certified technical service providers.
10. Tips to Extend the Lifespan of Your New Battery
Avoid extreme temperatures.
Do not keep the laptop plugged in at 100% charge all the time (ideal range: 20%–80%).
Use only original chargers.
Perform periodic calibration (discharge to ~10% and recharge to 100%).
Conclusion
Replacing a swollen laptop battery is not an impossible task, but it requires patience, precision, and safety. In our ThinkPad X1 Carbon case, the replacement was successful, restoring both battery life and device safety.
If you follow the steps outlined here and purchase a quality battery, your laptop can continue running for many more years without issues.






Leave a comment